


Who doesn't love a good hearty soup when the colder temperatures in the Fall and Winter months set in? In my opinion, there's nothing like it to warm you up inside, when the damp and the cold are chilling you right through to the bone. When you live in some Northern areas of the country, even Spring can be a very unpredictable season and we certainly have our share rainy periods where the dampness can make a 55 degree (Fahrenheit) day seem bone chilling as well.
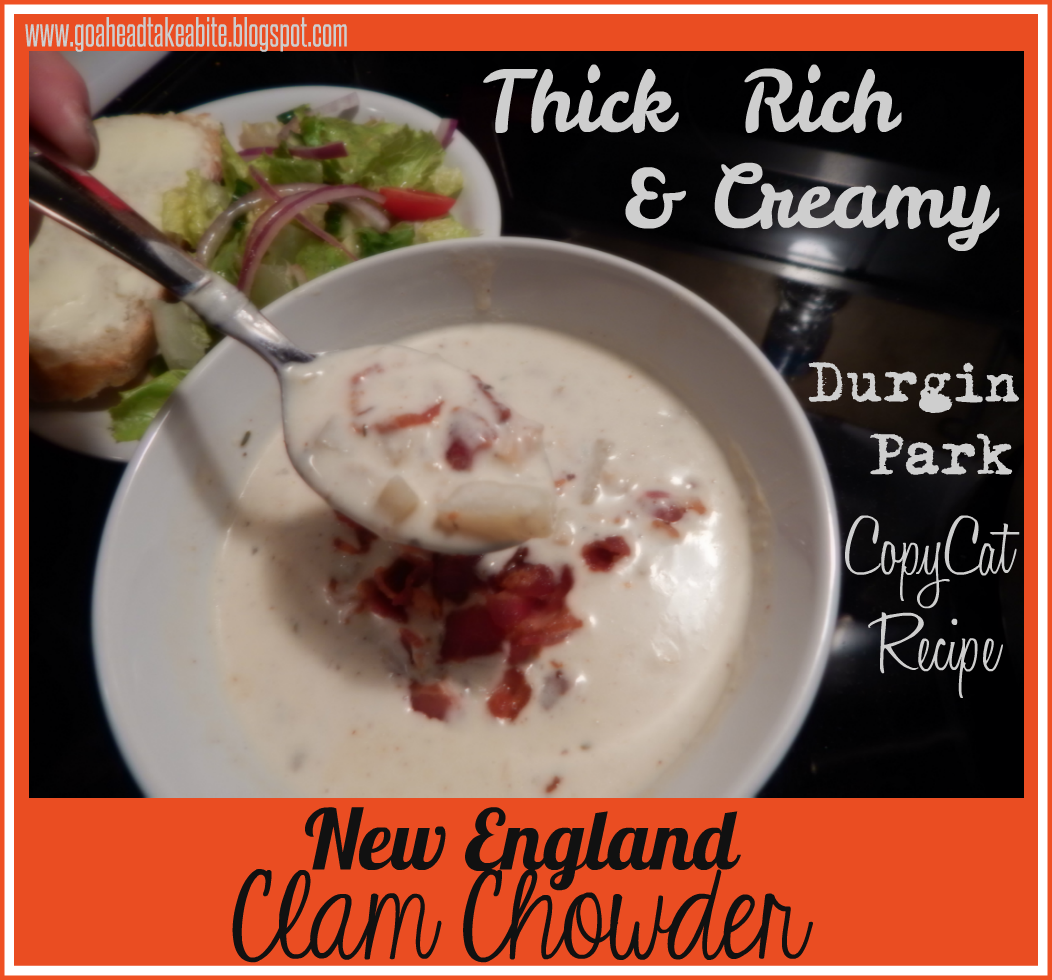
Being from the Northeastern part of New York State and only a 30 minute drive from the Vermont border, the folks here in my neck of the woods have always considered ourselves to be New Englanders, so it just stands to reason that one of our family's favorite soups has always been New England Clam Chowder. And why not? It has everything you could want in a 'warm your belly and your soul' kind of way. It has butter, rich cream, potatoes, onions and just the right amount of savory herbs, like thyme. And let's not forget the true stars of the show - those sweet, tender clams. Oh, and around here, it just wouldn't be complete without a generous sprinkling of crispy, smokey, crumbled bacon to top it all off.


Even after years of eating (and thoroughly enjoying) the clam chowder at home and at restaurants all over the Northeastern coast, I realized on a weekend trip to Boston - way back in the early eighties, that I hadn't really ever had the pleasure of what I believe to be the ultimate "chowdah" experience.
I refer to it as an experience because, well... that's the best way that I can think of to describe the unique and somewhat quirky atmosphere at the famous (or maybe I should say "infamous") Durgin Park Restaurant in the Faneuil Hall Marketplace in Boston, Massachusetts.
To this day, I stand firm in my belief that it is the best clam chowder (yes, that includes my own) that I have ever eaten. Now, I feel that it's important for me to explain that the chowder is not the menu item that the restaurant is most famous for, (that would be their "Boston Baked Beans") but, that being said and based on who you happen to ask, the answer to that question could be as varied as the the snowflakes that fall all around me each Winter. And now, after dozens of tweaks to my own recipe over the years, I feel like this is as close as it gets to Durgin Park's famous New England Clam Chowder.
This rich, creamy chowder can be made on a weeknight because the ingredients are simple and if you're an enthusiastic home cook or "foodie", you'll most likely already have the majority of what you need in your pantry and fridge. (IMHO if they're not - they should be) At the very least, they're all ingredients that you can easily find at most grocery chains across the country - so go on out and get you some,'K? 😉

Creamy New England Clam Chowder
(Serves a crowd. Approx 3 & 1/2 Quarts/18 Cups)
- 3 8oz Bottles Clam Juice + Juice From The Canned Clams
- 1 8oz Bottle of Clam Juice (optional/if needed)
- 4 6.5oz to 7oz Cans Chopped Clams, liquid reserved
- 1 Qt Half & Half
- 1 Pint Heavy Cream
- 2 8oz Bricks Cream Cheese
- 1 12oz Pkg Center Cut Bacon, chopped
- 2 Lg Russet Potatoes, peeled and cubed
- 1 Lg Yellow Onion, peeled and diced
- 1 Tsp Thyme Leaves (heaping)
- 1 & 1/2 Tsp Onion Powder
- 1 Tsp Celery Salt
- 2 Tsp Kosher Salt
- 1 Tsp Freshly Ground Black Pepper

First, dice your onion, peel and cube your potatoes and chop your bacon. Set these all aside in separate bowls.
As anyone who's been cooking for a long time will tell you... Always do your "prep work" first and things will go a heck of a lot faster when it's time to put it all together!

A good sharp peeler, just like a good sharp knife, can save you time and save you from having to raid your band-aid stash. If yours is old and dull, toss it into the trash and pick up a new one. They're generally not very expensive and a decently made peeler can easily be found in any large grocery store these days.


Try to keep the size of your potato cubes relatively the same. They don't have to be perfect, but you want them to be close so they'll cook as evenly as possible. You can keep your cubed potatoes in a bowl of very cold water, while waiting to add them to the pot. This will keep hem from oxidizing and turning brown. Just drain them well and blot them a bit with clean paper towels before adding them.

Bacon will slice much more easily if it's really cold, or even better yet, a little bit frozen. A really sharp knife is essential too, of course.

Speaking of that... I know that I mention this pretty frequently, but I can't stress enough how important it is to keep your knives as sharp as you can. Just like the vegetable peeler mentioned above, a dull knife is much more dangerous than a sharp one. It's so worth the initial investment to purchase a decent 10" Chef's knife, a 7" or 8" Santuko blade and at least one 4" to 5" paring knife. Also, look for knife blades that are made from carbon steel, since they hold an edge better and can be sharpened and honed easily at home in order to keep that edge.

Pre-heat a heavy bottomed large stock or pasta pot over medium to medium high, for roughly 60 to 90 seconds. You don't ever want to heat a dry metal pan to the point where it's literally "smoking" hot, but you do want it to be hot enough to hear that lovely sizzling sound as soon as the bacon hits the pan. (If you don't have a pot that has a solid heavy bottom, you might want to add a teaspoon of a light olive, or vegetable oil to the cold pan and swirl it around enough to coat the bottom in order to prevent sticking)

Add the chopped bacon to the pot and cook until it's nice and crispy, stirring or turning the pieces frequently. (approx 4 to 6 minutes)

Once the bacon is all golden brown and crispy, remove it with a slotted spoon to a plate lined with a couple of sheets of paper towel to drain. Set it aside.

If there's more than a healthy tablespoon (give or take) of bacon grease left in the pan, remove any excess and dispose of it - OR - store it for future use.
(I strain mine into - and save it in - a Ball pint jar in the fridge, to use when I'm making homefries, frying eggs, sweating a mirepoix for stocks, soups & sauces, etc. Let's just say that bacon grease has a plethora of other uses where it can add amazing flavor to a finished dish!)

Add the onions to the reserved bacon grease and turn the heat down to medium (if it isn't there already). Cook them, stirring often, until they begin to soften and are pretty much translucent. They'll probably take on a browned or caramelized appearance pretty quickly if there's a fair amount of browned bits (fond) left in the bottom of the pan from cooking the bacon - and that's a very good thing.


Once the onions are softened, add in the cubed potatoes and give it all a good stir to incorporate everything. If, at this point, your mixture seems like it's starting to stick to the bottom of the pan, you can add a little bit of vegetable or light olive oil - or that bacon grease, if you've saved it!
You only need to saute the potatoes and onions for about 5 minutes, because they're going to cook through completely in the liquids that will be added.

I usually won't shake bottled clam juice if I see what looks like darker or sand-like deposits that have settled at the bottom. There will almost always be at least some amount of sediment in bottled clam juice. As long as the residue is a white-ish gray color and isn't gritty or sandy looking, then go ahead a give it a shake. That is just an accumulation of fine particulates from the meat of the clam, left over from the shucking process.

Even if you make it a point to buy only the most expensive brand(s) of bottled clam juice, you're going to get a bottle here and there that has some amount of sediment in the bottom. It's just the nature of the beast, if you will. Clams spend the majority of their lives buried in the sand and it just stands to reason that at least some of that sand is going to stick around, even after they've been through the processing plant.
Of course, you could be really ambitious by going out to your local fishmonger, buying a bushel of whole clams and shucking them yourself. (being careful to save all of the liquor that comes out during the process) But keep in mind that even those clams will need to be soaked and rinsed, to make sure the majority of the sand is expelled. Then you'll need to make clam stock or broth, to take the place of the bottled clam juice.
As you know, I'm all for cooking from scratch... but this is meant to be an easy, pot of hearty soup that you can throw together on a weeknight. So let's get back to it, shall we?

Next, pour in the three bottles of clam juice, being careful to pour slowly and making sure to try and leave any of the sandy looking residue in the bottle. If a tiny bit gets into the pot, it's not the end of the world. As my dear old mother used to say, "You've gotta eat a peck of dirt before you die." I'm not really sure who came up with that quote, but I don't know if I want to learn the reasoning behind it. LOL

If you don't have enough to cover the potatoes, add a fourth bottle of clam juice (mentioned above as optional in the ingredient list). If you don't need it and you haven't opened it, you can store it in your pantry or cupboard until the "sell by" or "best by" date on the bottle.
Allow the broth to come up to a simmer.

I was at my daughter's house when I made this particular batch of chowder and she has a glass topped stove, so I didn't worry much about the heat. But, if I'm making this (or any other "dairy heavy" soup) on my gas cook top at home, I'll use one of those metal ring diffusers once the dairy has been added.

Once the soup has simmered for a minute or two, add your quart of half & half...

Your seasonings...


And your reserved clam "liquor" from the cans, *after straining if necessary.

*I find that the "Snow's/Bumblebee" brand is usually pretty good about making sure that there's not much sediment (if any) in their canned clams, but I have used other brands in the past when I couldn't find these and found that there was a fair amount of grit in each can. If you do happen to find a bit of sand or grit, you don't have to worry. As I mentioned re: the bottled juice, it's a perfectly natural thing for clams to have a bit of sand or grit in the shells. Some companies just do a better job at straining them before packaging than others. Just use a fine mesh strainer, lined with a bit of cheesecloth, if needed.
(I do not work for Snow's/Bumblebee and this is not a sponsored post. Any thoughts or comments about the quality of their products, are my personal opinion.)

Bring the chowder back up to a low simmer and continue to cook it at that same low temperature until the potatoes are just fork tender, stirring occasionally.

You want the potatoes to be tender, but be careful not to overcook them. You can see in the photo above that the potato cubes are still intact at this point and that is important because there's still a little bit more cooking time ahead.

Once the potatoes are just tender, add in your softened cream cheese, one brick at a time, stirring until the first one has melted before adding the second. You can cut the cream cheese up into cubes, but to be honest, I've found that as long as it's at room temperature, it will blend in just as quickly either way.

At first, it's probably going to look a bit lumpy and separated and you're going to wonder if you've made a mistake along the way, but trust me... every bit of it will dissolve and the soup will become a nice cohesive mixture.

The only "lumps" at this point, should be the potatoes.

Once all of the cream cheese has melted, add in your heavy cream and stir well.

Bring the chowder back up to a simmer and once you've reached that point, you can add in the drained clams. Again, you don't want cream soups to come up to a full boil. This can cause them to separate and become a bit of a mess. It can also cause the dairy products to scorch and that will definitely give it a "burnt" flavor.

When the chowder has simmered for another 5 or 10 minutes, it's time to serve! Remember - the clams don't really need to cook. You're just making sure that they're heated through. I always use chopped or minced clams in my chowder, but you could use the whole baby clams if you'd like to. I just find that there are fewer clams in the cans, ounce for ounce, and you tend to get more bang for your buck with the chopped/minced variety.

Make sure to give it a taste to check for seasoning before serving and if needed, add a bit more salt & pepper to taste. It's best to turn the stove off before serving because you don't want what's left in the pot to reduce too much further, or for the clams to get tough. Just slap the lid on the pot to keep it warm for anyone who might come back for seconds. (Around our house, they usually do!)

All you really need to make this creamy chowder a meal (at least in our house) is a big tossed green salad and a loaf of crusty bread and everyone will be as happy as a clam. (I know.... that really was pretty lame, but sometimes, I just can't help myself. I'm a total cornball! LOL) Oh, and don't forget to serve the crispy bacon, for folks to sprinkle on top of the chowder and/or the salad!

When I'm keeping things super casual, I just lay everything out buffet style and let people serve themselves. But if you're using this soup as a starter for a nice dinner party, you can certainly dish it up into smaller bowls and serve it to each person at the table. Just add a sprinkling of fresh parsley and a few pieces of the crumbled bacon on top of each bowl to make it look a bit more "up-scale". :)


Mary
Don't Forget To Follow Me On Social Media! I Post Blog Updates, Ideas For Kitchen "How To's", Restaurant Recommendations And Reviews And Always Lots Of Photos!
Don't forget that you can print this (or any) recipe using the "Print Friendly" button at the foot of each post. It's a great little feature that allows you to remove any pictures (or any text that isn't relevant to the recipe) before printing. That can save on ink and paper & in today's economy, who doesn't want to save a little cash when you can?!